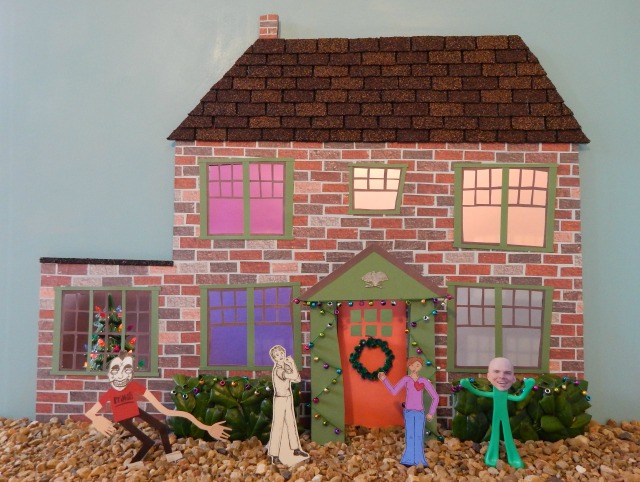
Christmas Card 2013 – House Diorama (Click it to see it bigger at Flickr.)
In 2012 we couldn’t get a card done in time. Our dog had just died and Paris was away at college. The motivation and planning didn’t come together. But this year we’re back! Mary had the idea of a diorama and we decided to make one of our house decorated for Christmas.
Roof – We cut up some extra shingles from the new roof we got this year.
Bricks – We took photos of the different bricks, printed them life size, and cut them up.
Windows – Mary cut out the windows and trim, using colors similar to the house. We tried to keep the whole thing slightly cartoonish and handmade-looking.
Bushes – Those are made of leaves from the actual holly bushes we have. Dangerous work hot gluing those together!
Christmas tree – My grandmother made that ceramic tree a long time ago.
Wreath and “lights” – Mary strung up some beads to make lights and made the wreath from green pipe cleaners.
Gravel – Straight from the driveway. Not exactly correct but a lot easier than making grass and a sidewalk.
Finally, each family member made his or her “self.”
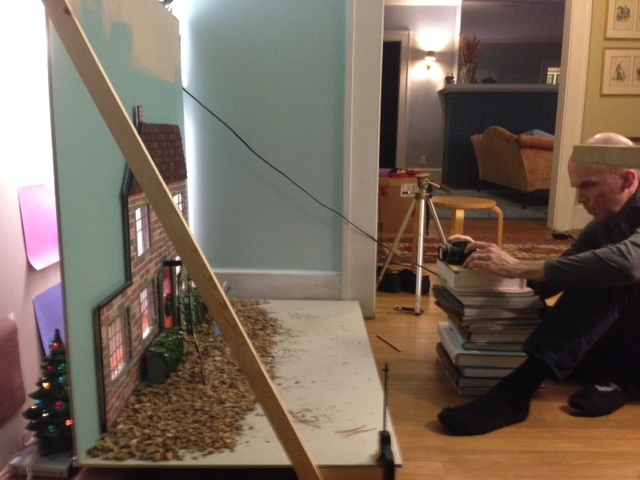
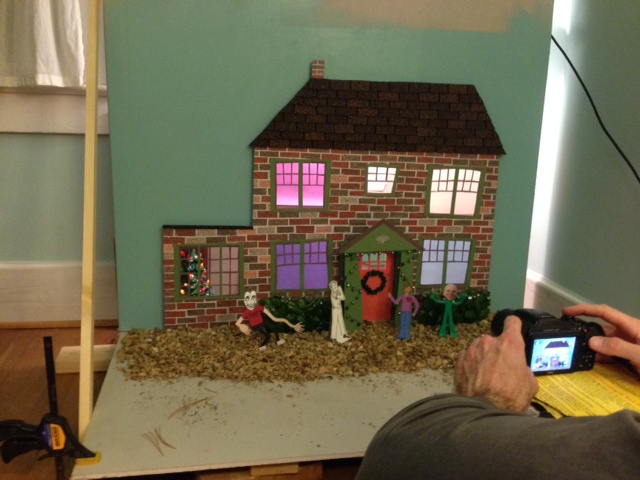
We started with a piece of foam core cut out for the house and glued the bricks and other parts to it. Then we backed with a piece of drywall also cut to the shape. Then put the whole thing on a large square of drywall so we could light it from behind and have the Christmas tree “inside.” We put pieces of colored paper behind the windows to create the appearance of rooms. The photos below show the set up.
As usual, these cards end up being a lot more work than we expect. But I don’t regret one minute spent working with my family to make something for ourselves, and other family and friends.
Christmas Card 2011 – Gingerbread People (Click it to see it bigger at Flickr.)
This year instead of using our bodies to make something we decided to use something to make our bodies. Gingerbread is the obvious seasonal choice for a medium. Yes, they/we taste good too…
Christmas card 2011 back photo
On the inside we decided to do a Sigler version of Mad Libs. Sorry Mad Libs for using your logo. Consider it free advertising. Mad Libs are fun and this idea gets out of long handwritten notes on every card. Nobody else seems to do that anyhow. Click the images for a closer view.
Detail of patch pocket. Two rows of topstitching for looks and avoiding slip stitching.
Mary has just started her new blog for sewing and all things related to fabric and fiber. In addition to posting projects there will be all sorts of tips and how-to stuff, and a lot of it will be in video form.
The blog design work hasn’t been done yet, but she’s not letting that stop her. I’ll feature some of the projects here too.
That’s how we do it. Hey! I just made a Facebook page for this blog. Please click the “Like” button over there on the right.
We just got the cards delivered yesterday. I normally wait until we have them mailed before I post about the latest card, but since some folks may not get theirs before Christmas I thought I would share it now.
As you can see in the video our dog Mika was determined to be part of the action. So, for the first time in his eight years we have included him.
And speaking of being included, if you’re not on our list just let me know and we will correct that.
I left the video camera running while we did this. The whole shoot took about 30 minutes. I think Paris had the idea for snowflakes. Originally, I wanted to recruit a ton of people, dozens at least, to make one giant snowflake somewhere in downtown Asheville, and shoot it from a building. But the ladies were thumbs down on that. I still may do it one year. That’s a lot of white clothes!
We hope you like it. If you haven’t gotten yours yet and you know you’re on the list email me. We still have a small batch that hasn’t been mailed. If you want one, no matter who you are, just let me know. We have a small number left.
The hits keep coming. Mary made a set of potholders from some funky 1970s style fabric for her funky (in a good way) older sister. She used some fabric meant for covering ironing boards in the middle because it’s heat resistant. Beyond that, she freely admits that she doesn’t know what she’s doing, and didn’t have directions. Freestyle sewing!
This Monster Backpack for our nephew is another Christmas creation by Mary. Handmade all the way. Even the bag it’s wrapped in is handmade. She Googled “cute cartoon monsters” to find different ideas and used them as inspiration for her own thing. To make the applique possible she had to simplify the final design. Mary has advanced sewing skillz, credentials even, but she makes it sound simple.
And, she was wrapping gifts in our freezing cold house. Lots of snow this weekend. Not much electricity. Sorry to whoever was calling during the video. We stop for no one.
The crafty lady is on a roll. This project is a tote bag made from some salvaged wool that she felted. Details include a fancy-pants interior pocket, and a functional/decorative patch. Curse you moths! No pattern was used. Freestyle sewing!
There is no Photoshop trickery happening here. This image was captured in one take using a single long exposure photograph. Blah blah blah blah, or you can just watch this video. Jump below for the details.
This large scale light painting of a Christmas tree was made in our backyard. On the ground the tree was 55 feet tall and about 25 feet wide. It appears short and fat because of the angle of the photograph. I had the camera, and video camera, in a stairwell window at the back of our house. I’m at least four storeys (someone asked, that is in fact the correct spelling) in the air because our property drops quite a bit. We are in the mountains. But the back lot is nice and flat. I used rope to lay out the tree and enlisted the family and some conveniently located neighbors to move the lights around.
The kids were in the middle of the tree swinging the light sabers (see below) in circles to make the “ornaments” and Mars walked back and forth to make a “garland.” The Moms (Mary and Jill) made the tree outline by waving two light sabers each as they walked along the rope, invariably racing at the end of each take to finish in time. I used a kitchen timer and called out the remaining seconds.
I wanted to do some light painting myself so I took the tripod and camera outside and made some “Nöels” in green and red. Nöel (Which I now know should be spelled “noël” – oof, embarrassing. I was in the dark!) is way easier than trying to write “Merry Christmas,” backward mind you, in the dark, before the time runs out and the shutter closes. Plus, Nöel is so short I was able to turn the light on and off for each letter, and add the umlaut over the “o.” I put a strip of four of these inside the card, along the top.
Nöel Light Painting
We did something similar for the family shot on the back of the card. For this one I used another camera, mounted on separate stand, just for the flash. That way I could move the lights around to make the frame, then get back into position before the second camera flashed, which would make us visible in the photo taken by the first camera. Staggering the timers on the two cameras so that the flash would happen after I was done drawing, but before the shutter closed on the first camera was a challenge. Have I mentioned we were in the dark? The image came out too dark on the card but the original looks good.
Family Portrait Light Painting
This was a fun card to make, but I was stressing about the execution. I mentioned to my friend Gary a couple months ago that I was worried about the logistics and he said something like “only you would have a Christmas card with logistical challenges.” Why do things the easy way? Walk hard.
Camera: Canon G9, 15 second shutter time, ISO 100, some other stuff I can’t remember
Lights: Light sabers from FlashingBlinkyLights.com, only $36 for 12 (Note to parents: some items at FBL are PG13); one regular flashlight for the garland. Sourcing some good lights was probably the toughest part. I looked everywhere, poi stuff, glow sticks, gels, etc. This idea needed large swaths of light and these sabers were perfect, and cheap!
People: 2 moms, 6 kids (one toddler helping Paris), and a gigantic whining dog with me in the stairwell
Want to know what it's like to have brain surgery? Well here's the long version of my experience. Complete with pictures and videos! Read all about the Brain Surgery Experience.